Putting sides and roof together
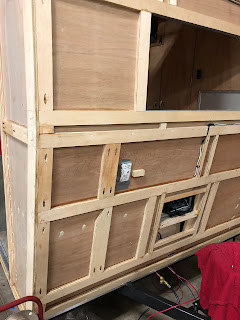
With the sides up and fastened to the floor, I added the front and rear cross pieces to connect them. After the front and rear cross bracing was installed, I adhered the interior birch paneling to them. In this photo, you can see the cutout for the original (well, original to me, but not original to the trailer) refrigerator venting. Since I need to match the cutout in the original aluminum siding which I am planning to reuse, I figured I would add a nice aluminum compartment door, whether it was functional or not. Since I couldn’t put a new gas operating fridge back in (I couldn’t find one small enough to fit the area safely) I decided on a nice 12volt/120volt unit which doesn’t need exterior venting. Also, on a random note, you can see how nice the use of a Kreg pocket hole screw jig is when building the trailer.
I added the necessary support blanks within the framing for the future solid screw anchoring of exterior light fixtures and other random vents, etc. These were not part of the original framing. I just thought it would be a good idea.
The roof is also made of 3/4” marine grade plywood. I added two middle ribs down the center that will create a small slope for water run off. When the rigid insulation is added, the roof will be a nice, solid, sloped roof. There was no attempt to slope the roof on the original trailer design. The aluminum roof was simply layer down flat with a small slope only around the vent framing which is 1-1/2” high. I also knew that since I was going to use a single sheet of aluminum roofing in place of the original multiple pieces with seams, that I couldn’t construct the new sloping roof ribs to tall or the sheet aluminum would not conform well without creases over multiple directions.


Comments
Post a Comment